How to Schedule Content on Instagram in 2026
Oct 27, 2026 · 12 min read
Your Reel is ready, the caption is sitting in a notes app, and the audience you want to reach won't be online until you've finished work. Meanwhile, tomorrow's Story needs a poll, and nobody has agreed to publish it. The calendar looks complete, but the publishing job isn't.
Learning how to schedule content on Instagram means separating posts that can publish automatically from content that still needs a person. A reliable workflow also includes file checks, audience-specific timing, and a recovery routine for anything that doesn't go live.
Which Instagram Formats You Can Schedule Natively
Stories are the gap in Instagram's in-app scheduler. Feed posts, carousels, and Reels can enter the native queue, while Stories need a separate publishing route. Treat a Story reminder as a task alert, never as proof that the Story will go live by itself.
Instagram formats and scheduling support:
| Format | Native Instagram scheduling | Typical third-party tools | Planning limit |
|---|---|---|---|
| Feed photo or video post | Yes, professional accounts | Yes, most tools | Well in advance |
| Carousel | Yes, professional accounts | Yes, most tools | Same as feed posts |
| Reel | Yes, professional accounts | Yes, most tools | Well in advance; choose audio before scheduling |
| Story without stickers | No | Direct publishing through supported tools, otherwise reminders | Post manually or set a reminder |
| Story with polls, quizzes, countdowns or links | No | Limited support for interactive elements | Needs someone available at publish time |
Native scheduling lets eligible businesses and creators prepare feed posts and Reels well in advance, while DataReportal's Instagram overview puts the platform's international scale in context with an estimated advertising reach of 1.74 billion users in January 2025. The operational benefit is batching. The same slot still has to fit each audience.
Build around the manual work
Before drafting captions, mark each calendar item automatic, notification-assisted, or manual. For a notification-assisted post, somebody still has to receive the alert, open Instagram, complete the content, and publish it.
A bakery could queue a product carousel and a behind-the-scenes Reel, but assign its customer-vote Story to the person working that afternoon. That owner needs the finished asset, poll wording, answer options, and access to the correct account.
Practical rule: Build the calendar around the posts that require someone online, then place automatic posts around those commitments.
Native scheduling suits a straightforward publishing workflow. A third-party tool becomes useful when you need shared visibility, approval coordination, or a calendar spanning several networks. Test the exact format you intend to publish, including audio, tags, and interactive features. A supported upload can still miss the elements that make the post work.
Media Specs and Caption Checks Before You Queue
Use these export presets as practical starting points, then inspect the actual Instagram preview. A file that uploads successfully can still have an awkward crop, unreadable text, or an unsuitable cover.
Recommended media specs by format:
| Format | Aspect ratio | Pixel size | Check before queuing |
|---|---|---|---|
| Feed portrait | 4:5 | 1080 × 1350 px | Key text stays inside the centre area |
| Feed square | 1:1 | 1080 × 1080 px | Works as a fallback for grids and older layouts |
| Feed landscape | 1.91:1 | 1080 × 566 px | Crops tightly, so keep key text centred |
| Reel | 9:16 | 1080 × 1920 px | Cover frame chosen and audio confirmed |
| Story | 9:16 | 1080 × 1920 px | Text clear of the top and bottom interface bands |
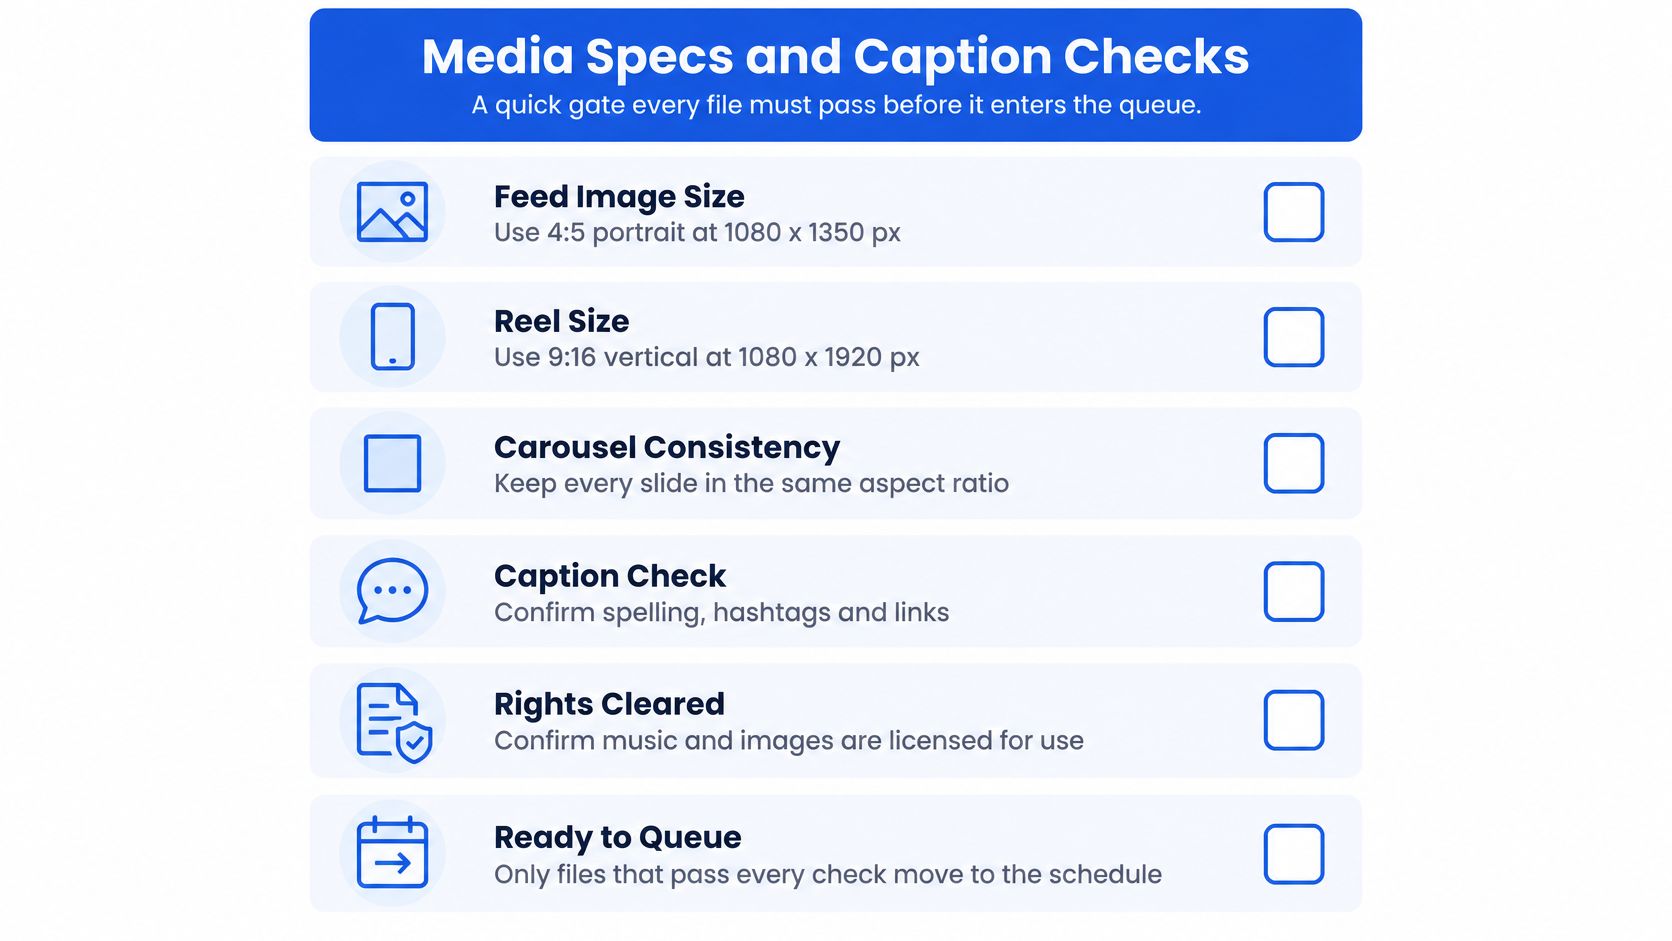
These are recommended production dimensions, not a complete list of accepted upload specifications. Keep carousel slides in the same aspect ratio, and preview the sequence rather than approving each image separately.
Use this checklist as the final gate before moving an asset into the queue.
Check the complete post, not just the file
For Reels, choose a cover that remains understandable when cropped in the profile grid. Confirm that music is available for the account and intended use, and clear rights for any images, footage, or audio you didn't create.
If you're building video assets from scratch, Wideo's guide to create Instagram content with Wideo can help with production before you reach the scheduling stage. Keep production and publishing checks separate so a polished video doesn't bypass caption or permission checks.
- Caption and hook: Put the useful promise or central idea first. These hooks that stop the scroll offer starting points, but the opening must match what the post delivers.
- Accessibility and identification: Review alt text where available, subtitles, mentions, collaborator tags, and location. Check handles against the intended account rather than trusting autocomplete.
- Links and instructions: Confirm the destination works and the caption tells readers where to find it. Don't assume a pasted feed-caption URL provides the same experience as a Story link sticker.
- Measurement: Assign a primary outcome, such as discovery, saves, shares, or profile actions, before approving the post.
For an initial cadence, Buffer's Instagram engagement analysis supports starting at approximately four posts per week, with a 10–20% buffer of unscheduled slots for timely content and experiments. Treat that as a production baseline, not a quota that justifies publishing weaker work.
Choosing Posting Times and Testing Your Calendar
There isn't a single best posting time that you can copy into every account. In its analysis of 391,490 professional Instagram accounts between January and June 2024, Metricool's benchmark report identified 7 p.m. to 9 p.m. as the strongest general publishing window, with 8 p.m. leading. That gives you a candidate to test, not a dependable appointment with your audience.
Check Instagram Insights before selecting slots. Record follower-active periods and audience locations, then write the audience's time zone beside each candidate window. A calendar entry that says only “evening” is incomplete when the person scheduling and the people watching live in different regions.
Keep your planning notes beside the calendar rather than scattered across screenshots and messages.
Run a controlled timing test
Use a repeatable weekly content system so you're comparing publishing windows rather than completely different creative approaches.
- Hold the creative variables steady: Compare posts with similar topics, formats, caption lengths, and production quality. Don't pit a product announcement against an evergreen tutorial and attribute the difference entirely to timing.
- Separate formats: Compare Reels with Reels and carousels with carousels. Instagram describes distinct ranking systems for Feed, Explore, and Reels in its algorithms and ranking guidance, so a practical test should evaluate results by surface.
- Record meaningful outcomes: Track reach alongside saves, shares, watch time, and profile actions where available. The metric should match the post's intended job.
- Keep cadence stable: Don't increase frequency while testing a new time window. You won't know which change contributed to the result.
For example, a tutorial account could alternate comparable educational carousels between an audience-local lunch window and an evening window. Keep a note of unusual events, promotions, or collaborations that might make a post unsuitable for comparison.
A timing test is useful only when you can explain what stayed the same.
Compare typical results rather than choosing a slot because it produced an isolated breakout post. Use the same engagement-rate definition throughout, and examine interactions relative to reach as well as follower count. A larger follower base doesn't mean every follower had an opportunity to see the post.
Retain the promising windows, replace weak ones, and keep testing. If the results are close, choose the slot that also lets someone respond to comments and questions.
How to Schedule a Feed Post or Reel Step by Step
Start with a professional account, either business or creator, for this native scheduling workflow. Check that you're working in the intended profile before uploading anything, especially if you manage several brands.
Instagram changes interface labels, so you may see More options instead of Advanced settings. The important distinction is reaching the scheduling control before tapping the final publishing button.
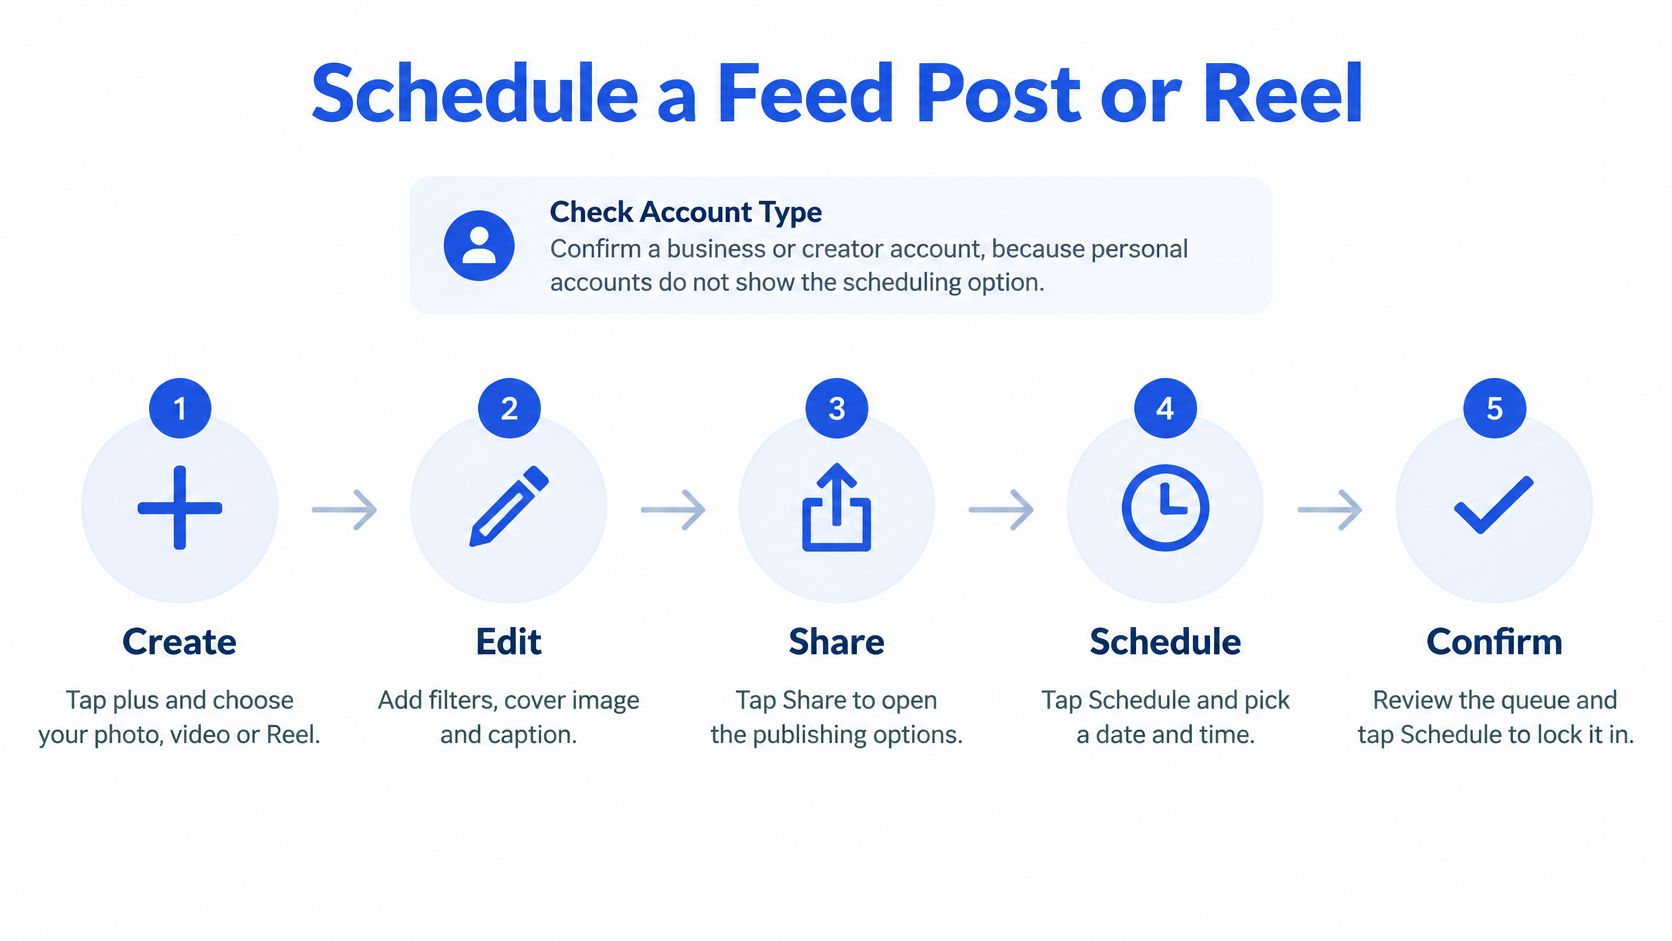
This visual summarises the sequence. In the app, open the share screen without confirming immediate publication.
Create, schedule, and verify
Create the post or Reel. Tap the create control, choose the format, and upload the approved media. For a carousel, check slide order before continuing, because a reversed sequence can make the caption or final call to action confusing.
Complete the publishing details. Add the caption, cover, tags, location, and supported accessibility details, then continue to the share screen. Listen to the Reel preview rather than assuming the selected audio survived the editing process.
Open the scheduling settings. Look under Advanced settings or More options for the scheduling toggle. If it's missing, check the account type, update the app, and test a simple draft without optional features before troubleshooting a complex post.
Choose the date and time. Convert the intended audience-local time into the time displayed by the scheduling interface, checking the device's time zone. Read the selected date back carefully, particularly when preparing posts for an audience whose calendar day differs from yours.
Confirm and inspect the queue. Return to the final screen and tap Schedule, then open Scheduled content from the profile menu or available publishing controls. Verify the correct asset, caption, account, date, and time, because leaving the composer isn't proof that the post entered the queue.
The walkthrough below provides another view of the scheduling process; follow the labels available in your current app.
Handle edits without creating duplicates
Open the scheduled item and inspect its available editing controls. If the needed change isn't supported, save the corrected material, remove the old scheduled version, and create a replacement.
Check that the original has actually left the queue. Otherwise, both versions can publish, particularly when someone else is making changes at the same time. Give a team member ownership of each revision and record whether the item is approved, queued, or awaiting replacement.
For desktop work, Meta Business Suite offers another route for preparing and scheduling feed posts and Reels. Check the options shown for the connected Instagram account before designing a workflow around a particular tag, audio feature, or approval requirement.
Review upcoming posts before their publishing day. Confirm that the offer is still valid, the linked destination is ready, and nobody has queued a competing announcement for the same audience.
Fixing Scheduled Posts That Fail or Stall
A post that didn't publish needs diagnosis before another upload. Work through three layers in order: account access, media processing, then the scheduled time. Check the live profile first, because a delayed status update can make a successful post look missing, and reacting too fast creates a duplicate.
Scheduled post failures, causes and fixes:
| Symptom | Likely cause | Fix |
|---|---|---|
| Post did not publish at the set time | Expired permission or disconnected account | Reconnect the account, approve access again, then reschedule |
| Reel stuck in processing | Failed media processing or file outside the spec | Re-export using the recommended media settings and upload a fresh copy |
| Reel posted without its audio | Track removed or unavailable for use | Replace the track before scheduling and check availability |
| Post went out an hour off | Device time zone differs from the audience's zone | Confirm the time zone, then reschedule with the local time checked |
| Posts missing from a busy day | Daily scheduling capacity exceeded | Spread the volume across days |
Daily scheduling limits can apply, and they differ between Instagram's own tools and third-party schedulers. Before a launch or a heavy posting day, check the current limits in your scheduling tool and Instagram's help pages, and spread high-volume days across the week. Treat capacity as a constraint to plan around, not the explanation for every missing post. Most single failures trace back to permissions or files.
Recover in a deliberate order
Capture the failure message and the intended publishing time before changing anything. Reconnect the account if needed, confirm the requested permissions, and inspect the queued item before building a replacement. That one screenshot of the error often decides whether you fix a connection or fix a file.
Test the file itself next. Open the exported video locally, check its sound, and upload a fresh export if processing has stalled. Retrying the same damaged or unsupported file does not address the cause.
If the intended slot has passed, decide whether the content is still relevant. Publish manually when it still serves the campaign, but withdraw an expired offer or a missed-event announcement rather than posting it only to clear the queue.
Recovery safeguard: Remove or cancel the failed queued item before publishing its replacement.
Interactive Stories and anything else that still needs a person online at publish time deserve the same recovery discipline. Prepare a handoff package containing the asset, sticker wording, answer choices, destination link, and named publisher, so one person owns the slot if the queue fails. Set a reminder before it and confirm the assigned person can access the account.
Log the cause and the corrective action in the calendar beside the post. Patterns surface quickly: the same disconnected account, the same export setting, the same overloaded day. A short morning check of connections, upcoming assets, and manual assignments beats discovering a silent failure during the next reporting session.
Set Up Your First Scheduled Week
Start tonight with a manageable batch rather than filling every available calendar slot. Choose content themes you can sustain, then assign each draft a purpose and format.
- Choose the mix: Use a Reel for discovery, a carousel for a useful explanation, and a single image only when the visual can carry the message.
- Prepare the batch: Export the assets, finish captions, and inspect covers, audio, tags, and crops before scheduling.
- Place the posts: Use audience-local windows and leave room for timely content rather than committing the entire calendar.
- Assign live work: Mark Stories and other manual items clearly, with a named owner and a reminder.
- Book the review: Add the intended outcome beside each post and schedule time to assess performance after publication.
Keep the drafts, publishing notes, and results in the same document. When you're ready to plan a month of content, expand the themes that produced useful results, not the ones that were merely the easiest to make. Change a single variable at a time so the next batch teaches you something.
Social Media Scheduler brings drafting, channel-specific tailoring, scheduling, and analytics into a shared publishing workflow. Once your agent is connected, ask it to plan the week, and it drafts the posts while we tailor them for each channel and schedule them. Visit Social Media Scheduler to turn your approved Instagram ideas into a planned week, while keeping manual publishing assignments explicit.