How to Schedule Posts on LinkedIn in 2026
Oct 31, 2026 · 11 min read
The most common LinkedIn scheduling advice is to find the “best time,” queue a post, and move on. That treats a scheduled timestamp as proof of delivery. It isn't: LinkedIn's native scheduler executes a time, but eligibility rules, device settings, and handoffs can still make a post miss its intended window.
A dependable workflow starts before the composer opens. First confirm the post can be scheduled, then set its time against the audience's local clock, verify the saved queue entry, and check what published. That turns scheduling from a convenience feature into an operational control.
Which Posts LinkedIn Will Queue
Check eligibility before drafting. LinkedIn's native scheduler supports ordinary posts for personal profiles and Pages, but not Events, Jobs, or Services. The table distinguishes what can enter the queue from what needs a manual publishing plan. The eligibility and time-zone constraints are described in LinkedIn's scheduling guidance.
| Post or account | Can schedule natively | Lead time | Clock to verify |
|---|---|---|---|
| Personal profile post | Yes | 10 minutes to 3 months | Device time zone, stored as UTC |
| Page post | Yes, if you're a super admin or content admin | 1 hour to 3 months | Administrator's location |
| Events | No | Not queued natively | Publish manually |
| Jobs | No | Not queued natively | Publish manually |
| Services | No | Not queued natively | Publish manually |
| Campaign past 3 months | No, until it enters the window | Rolling batches only | Editorial calendar, then the native queue |
Treat eligibility as a planning gate
For each item in the week's plan, record whether it's native-eligible or external-only. Events, Jobs, and Services need a manual publishing step, while a campaign scheduled more than three months ahead must stay on an editorial calendar until it enters LinkedIn's scheduling window. The distinction matters because a post that can't be queued natively won't become reliable just because someone added a time to a spreadsheet.
The interface clock also needs an owner. A personal-profile post uses the device's time-zone setting and stores the selected time in UTC. Page scheduling displays time based on the administrator's location. A laptop set to a traveler's current location, or a Page managed from another market, can therefore show a different local time from the one the audience expects.
That creates a control problem, not just a calendar problem. If a post is set to publish at 9 a.m. without naming the time zone, two people can interpret the same instruction differently. Teams managing opening lines and creative can also use a hook-writing checklist, but a strong hook won't fix a post that was never eligible to queue or was set against the wrong clock.
Keep long-range plans in one editorial calendar and feed eligible items into LinkedIn in rolling batches. Before anyone drafts the week's posts, label each item native-eligible or external-only, and make the publishing method explicit.
How to Schedule a Profile or Page Post
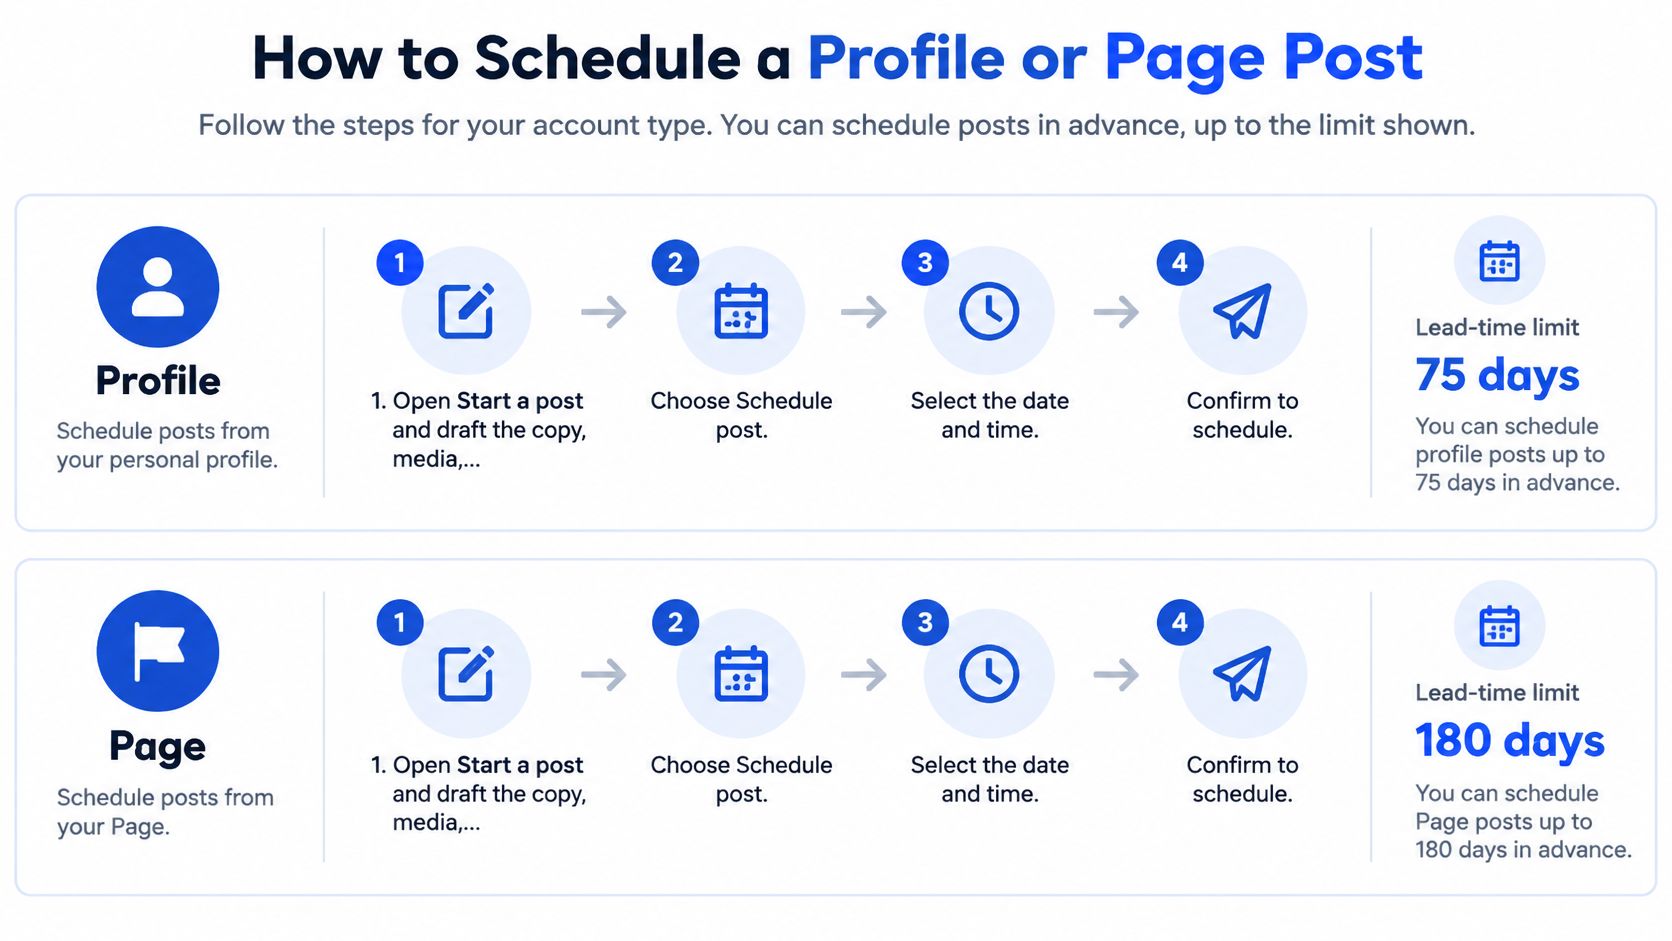
LinkedIn's composer has a simple click path, but accuracy depends on reviewing the post and timestamp before treating the queue as complete. LinkedIn's profile scheduling instructions describe the native workflow and the ability to review scheduled items after saving.
Personal profile
- Open Start a post and draft the copy, media, and link.
- Select the clock icon.
- Choose a date and time within the profile's permitted scheduling window.
- Click Next.
- Check the scheduled timestamp against the audience's time zone.
- Click Schedule.
Draft the copy and attach its media before choosing a slot. That lets you assess the finished post rather than scheduling an incomplete shell and hoping you remember to revisit it. Check the preview and open the link while you're still in the editing flow.
LinkedIn Page
- Open the Page's Page posts area as a super admin or content admin.
- Select Start a post, compose the content, and preview it.
- Choose the scheduling icon.
- Pick a date and enter the intended time directly, rather than relying only on the dropdown's half-hour increments.
- Click Next, finish reviewing the post, and click Schedule.
For either path, return to the scheduled-post queue after saving. Confirm that the item appears with the intended copy and timestamp. A click on Schedule is an action, not a verification; the queue entry is the evidence that the post was saved for later.
Use the queue as a control surface
A scheduled post isn't locked away. LinkedIn allows Page posts in the queue to be published immediately, edited, rescheduled, or deleted. Use that flexibility to correct mistakes before publication, not as a reason to skip review.
The operating habit is three-stage: draft and review, schedule into a tested slot, then evaluate reach afterward. Scheduling solves execution at a chosen time, but the performance question still needs a later check. For teams that also need to coordinate responses once a post goes live, Boocoo's guide to managing social media enquiries offers useful context for connecting publishing with follow-up.
Time Zones and the Status You Should See
A post can look right on a London manager's laptop and still miss a New York audience's morning. If the manager selects a local time without naming the target zone, the intended New York slot can be shifted by the difference between the two clocks. LinkedIn Page scheduling displays the administrator's location, which makes that mismatch easy to overlook; its Page scheduling guidance also advises entering an exact time when the dropdown increments don't match the intended slot.
Five checks for the publishing handoff
- Name one canonical zone. Put an explicit time zone on the content brief, such as
America/New_York. A city or market is not a reliable substitute when teammates work across locations. - Set slots for the audience. Choose the audience's local morning, not the author's default working hours. For a global account, give each channel or market its own slot.
- Compare the saved stamp. After scheduling, reopen the queue and match its displayed timestamp to the canonical zone. If the values disagree, correct the entry before relying on it.
- Recheck daylight-saving transitions. Review each scheduled item that crosses a clock change in either the administrator's or audience's market. A previously correct conversion may no longer match the intended local time.
- Confirm at handoff. The next person should verify the zone, media, and link before the slot. A traveler's device may have changed time-zone settings since the item was first drafted.
Operational rule: Record the audience's time zone in the brief, then check the saved queue against it. Don't infer the intended market from whoever scheduled the post.
Read the status, not the intention
A post can be a draft, queued for a future timestamp, or published after its slot. Those states answer different questions: whether it was saved, whether LinkedIn has a future instruction, and whether it has gone live. If a post doesn't appear when expected, investigate whether it remained a draft, whether the device or administrator time zone shifted, or whether the post type was ineligible.
On the day of publication, compare one live post's timestamp with the recorded time. That spot check tests the actual outcome, not just the interface setting. If the times differ, pause and correct the workflow before applying the same setting to more posts.
Weekday Windows Worth Testing First
A queued post proves only that a time was entered. It does not prove the post is eligible to publish or that the selected time matches the audience's local clock. Treat timing benchmarks as test windows, then check whether each post can publish as scheduled and compare its results with your own account.
Hootsuite's 2025 analysis of more than 1 million social posts identified 8–9 a.m. on Tuesdays and Wednesdays as the overall strongest LinkedIn posting window, according to Hootsuite's analysis.
| Window | Days | Clock | How to use it |
|---|---|---|---|
| Overall strongest reported window | Tuesday and Wednesday | 8:00–9:00 a.m. | First slot to test |
| Weekday daytime band | Monday–Friday | 9:00 a.m.–5:00 p.m. | Broad range to sample, not one minute |
| Monday contrast | Monday | 2:00–4:00 p.m. | Compare against morning slots |
| Tuesday lift | Tuesday | From about noon | Secondary weekday test |
| Localized mornings | Per audience market | Local 8:00–11:00 a.m. | Compare markets separately |
Test ranges, not folklore
The Hootsuite window is a starting point, not a universal rule. For a global brand, test local publishing times separately across North America, Europe, and Asia-Pacific rather than applying one headquarters-based schedule to every audience. If the account serves one market, compare a Tuesday or Wednesday morning with a weekday afternoon.
Keep the post format reasonably consistent across recurring slots. Comparing a text post in one window with a carousel in another makes it harder to tell whether timing or format affected the outcome. Track reach and engagement rate across several weeks, and measure social engagement with Assertive Agency to frame the comparison.
Keep the windows that perform for the account and audience. The useful result is a recurring local slot that produces stronger outcomes for your content and can be checked against the intended publishing time.
Habits That Keep the Queue Honest
Posting volume isn't a target to copy from a larger account. In 2025, LinkedIn accounts with more than 100,000 followers published an average of 43.48 posts per month, while accounts with up to 1,000 followers averaged 0.98 posts per month, according to figures published by Statista and summarized by SocialBee's LinkedIn statistics page. Those averages describe different account sizes, not a recommended cadence for every profile.
Build a queue that fits your capacity
Batch a week or month of posts, but keep anything beyond the native scheduling horizon on an editorial calendar. As the horizon rolls forward, move eligible posts into the queue in batches. A weekly content system can help make that recurring planning session a routine rather than a last-minute scramble.
Before setting the clock, run a short pre-queue check:
- Confirm the post type: Make sure the item can be scheduled natively.
- Check the lead time: Confirm the date is inside the allowed scheduling window.
- Name the canonical zone: Put the audience's time zone on the brief.
- Test the link: Open every URL and document so a broken destination doesn't publish on time.
- Assign the review owner: Name who will check reach after publication.
The link check matters because automation can faithfully publish a flawed post. A scheduled timestamp proves only that a time was selected, not that the destination works or that the content met its purpose.
Keep timing comparisons fair
Use the same post type within a timing test. Comparing a carousel in one slot with a text-only update in another confounds the result: the format changes alongside the time. Review reach and engagement before moving a slot, then change one part of the test at a time.
A steady cadence should reflect the team's capacity to draft, review, publish, and learn. Queue size is not the outcome. The useful operating measure is whether the team can maintain its chosen rhythm, verify publication, and use the results to improve the next planning cycle.
Move the Week Onto One Calendar
Stay with LinkedIn's native scheduler if one person manages a single profile or Page, publishes a few times a week, and controls the device time zone. The native queue can handle a straightforward one-channel workflow. A unified calendar becomes more useful when the same idea needs platform-specific versions, multiple people hand off Page access, or missed morning slots have already disrupted the cadence.
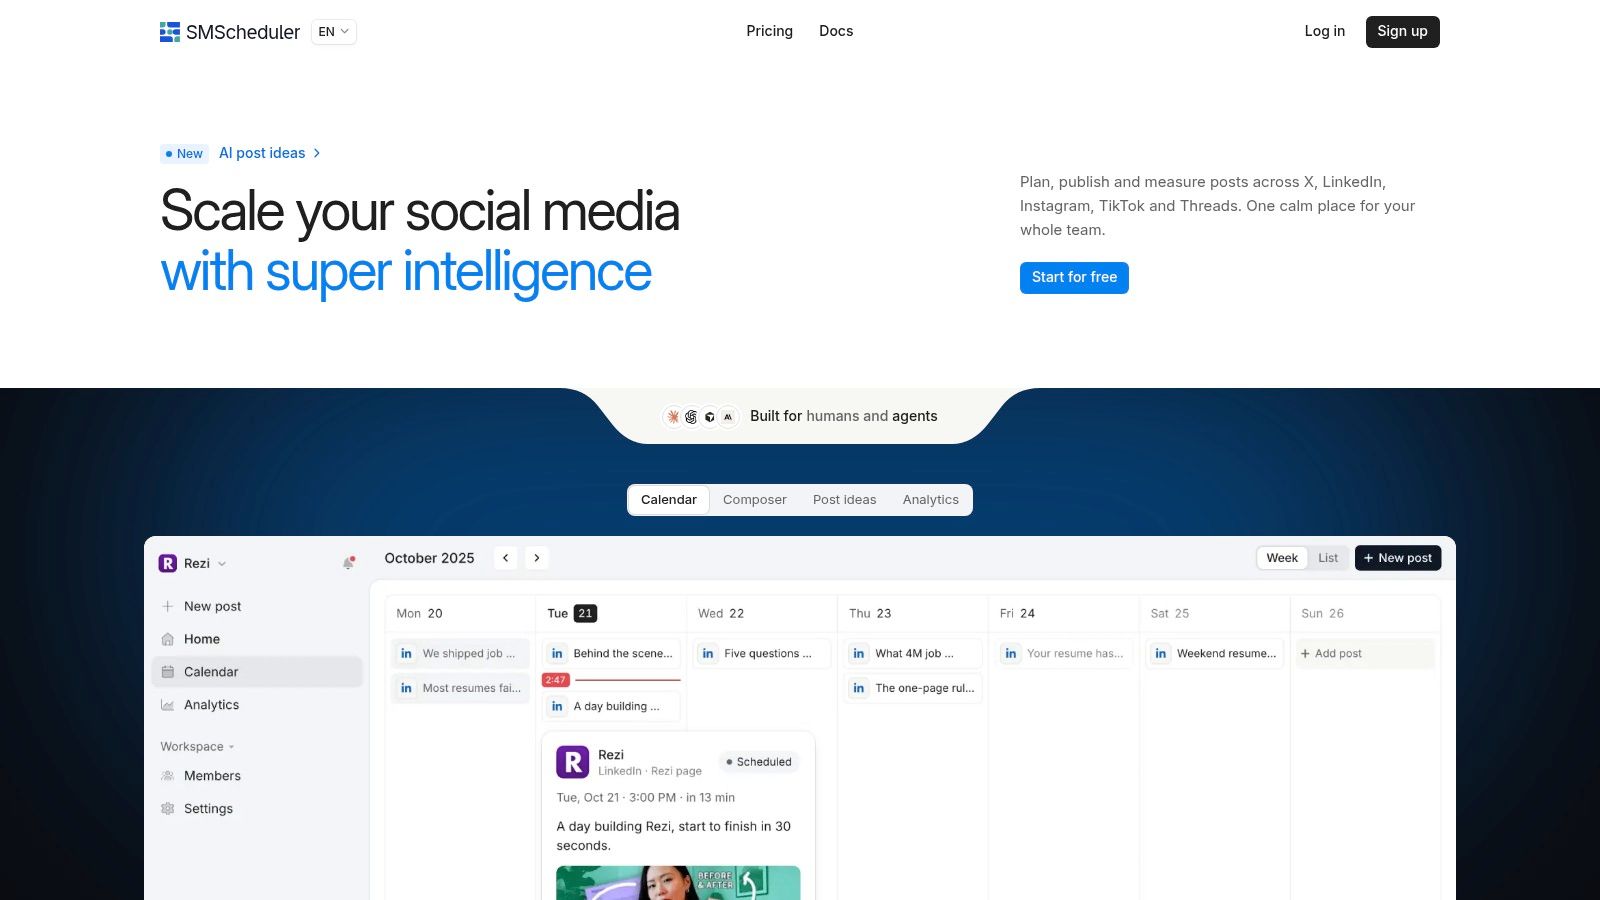
The advantage of one calendar is operational visibility: teammates can see which post is planned for which channel and time without stitching together separate queues. Social Media Scheduler's calendar displays posts for every channel in a week view or list view, and its plans include X, LinkedIn, Instagram, Threads, TikTok, YouTube, Facebook, and Bluesky. For a team already planning across networks, planning a month of content can help structure the editorial work before posts enter their channel-specific slots.
Run a setup week, then verify it
Connect the accounts, draft the week once, and tailor each network's copy rather than copying identical text everywhere. Assign each post a slot in its audience's local morning, then keep the schedule visible in one calendar or list. That view helps the team spot a gap, a collision, or an item assigned to the wrong channel before publication.
Then test the status transition. After the first queued week, open one LinkedIn item and confirm it moved from queued to published at the recorded timestamp. Use that check as the standard for the next month. The tool matters less than the comparison between the planned local time and the post's actual publishing status.
If missed slots, cross-platform handoffs, or scattered queues are slowing your publishing workflow, Social Media Scheduler brings drafting, channel-specific tailoring, scheduling, and performance measurement into one calendar. Visit Social Media Scheduler to plan your next publishing week and verify what goes live.